Difference between revisions of "Exporting and Importing Data"
Jump to navigation
Jump to search
Hermosillo.c (talk | contribs) |
Hermosillo.c (talk | contribs) m (→Importing Data) |
||
| (3 intermediate revisions by the same user not shown) | |||
| Line 14: | Line 14: | ||
| − | {{ | + | {{Infoshortgrey | The '''Export'''/'''Import''' window can be accessed in QuickBooks via '''File → HandiFox → Export/Import'''}} |
| − | ==Exporting Data== | + | ==[[File:comp.png | 36px]]Exporting Data== |
# In QuickBooks, go to ''File → HandiFox → Export/Import.'' | # In QuickBooks, go to ''File → HandiFox → Export/Import.'' | ||
# Check the boxes of the data you wish to export. To check all boxes at once, check the box to the left of the column title ('''Information to export/import''') | # Check the boxes of the data you wish to export. To check all boxes at once, check the box to the left of the column title ('''Information to export/import''') | ||
| Line 22: | Line 22: | ||
# Select to which drive/folder you want to export your data. | # Select to which drive/folder you want to export your data. | ||
# Click on ''OK''. | # Click on ''OK''. | ||
| − | + | <br> | |
{{Gototop}} | {{Gototop}} | ||
<br> | <br> | ||
| − | ==Importing Data== | + | ==[[File:comp.png | 36px]]Importing Data== |
# In QuickBooks, go to ''File → HandiFox → Export/Import''. | # In QuickBooks, go to ''File → HandiFox → Export/Import''. | ||
# Check the boxes of the data you wish to export. To check all boxes at once, check the box to the left of the column title (Information to export/import) | # Check the boxes of the data you wish to export. To check all boxes at once, check the box to the left of the column title (Information to export/import) | ||
Latest revision as of 17:51, 14 July 2021
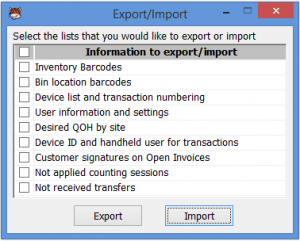
The Export/Import window allows exporting and importing:
- Inventory and bin barcodes.
- Device list and transaction numbering.
- User information and settings.
- Desired quantity on hand by site.
- Devices’ IDs, location and handheld users for transactions.
- Customer signatures on open invoices.
- Not applied counting sessions.
- Not received transfers.
 Exporting Data
- In QuickBooks, go to File → HandiFox → Export/Import.
- Check the boxes of the data you wish to export. To check all boxes at once, check the box to the left of the column title (Information to export/import)
- Click on Export.
- Select to which drive/folder you want to export your data.
- Click on OK.
 Importing Data
- In QuickBooks, go to File → HandiFox → Export/Import.
- Check the boxes of the data you wish to export. To check all boxes at once, check the box to the left of the column title (Information to export/import)
- Click on Import.
- Select from which drive/folder you want to import your data.
- Click on OK.
