Sales Orders
HandiFox allows users to create Sales Orders, orders issued to customers and specified items or services including their price, quantities, terms and conditions.
Contents
Sales Order Screen
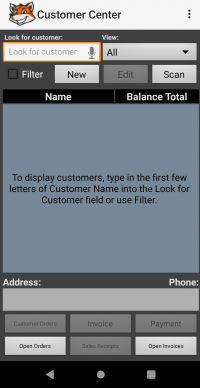
- Look for customer field allows looking for the customer you want to work with.
- View drop-down menu allows watching active or all the transactions.
- Filter checkbox allows creating filters to look for customers according to specific features.
- Look for field allows entering the information which helps to find the customer.
- In drop-down menu allows choosing the field to which the filter would be applied.
- Back button allows leaving the Filter screen without saving changes.
- Apply button allows applying filters.
- New button allows creating a new customer.
- Edit button allows editing created customers.
- Scan button allows looking for transactions with the help of a scanner.
- Customer Orders button allows performing different actions with sales orders like creating new, editing, picking or invoicing.
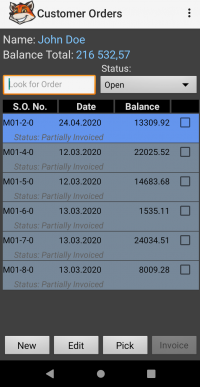
- Look for Order field allows entering the number of sales order which helps to find it
- Status drop-down menu allows looking for sales orders according to their status
- New button allows creating a new sales order.
- Edit button allows editing existing sales orders.
- Pick button allows picking sales orders.
- Invoice button allows invoicing sales orders.
- Open Orders button allows performing different actions with open sales orders like editing and picking.
- Look for customer field allows entering the name of the customer to find them.
- Filter checkbox allows creating filters to look for customers according to specific features.
- Look for field allows entering the information which helps to find a customer.
- In drop-down box allows choosing a section to which the filter would be applied.
- Back button allows leaving Filter screen without saving changes.
- Apply button allows applying filters.
- Scan button allows looking for transactions with the help of a scanner.
- Look for Order field allows entering the number of the sales order to find it.
- Status drop-down menu allows looking for sales orders according to their status
- Edit button allows editing existing sales orders.
- Pick button allows picking sales orders.
Edit Item Screen
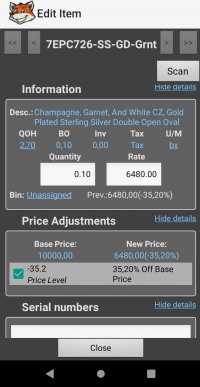
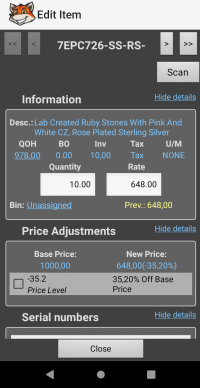
- Scan button allows looking for items using a scanner
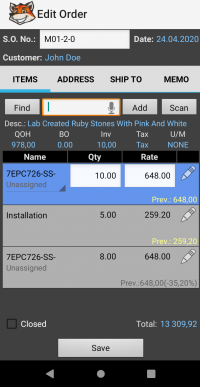
- QOH: shows the number of units that are physically located in the warehouse at the current time.
- BO: shows the number of backordered items.
- Inv: shows item's invoice status.
- Tax: shows tax rate.
- U/M: shows unit of measure type.
- Quantity field: shows item quantity.
- Rate field: shows item rate.
- Bin: shows bin status for the item (assigned/unassigned).
- Prev.: shows the previous rate.
- Hide Details button allows hiding the details about the item on the screen.
- Base Price: shows base price before applying a price level.
- New Price: shows new price after applying a price level.
- Serial Numbers field allows assgning seral numbers to the item.
Creating Sales Orders
HandiFox allows creating sales orders in the app and sending it to QuickBooks.
- On the app, go to Main → Sales.
- Fill in the name of the customer you want to create a sales order for and choose it in the list.
- Tap Customer Orders, then New to create sales order.
- Tap Find and choose all the items you want to create a sales order with.
- Tap Add.
- Fill Qty and Rate columns with data if it is needed.
- Tap Save.

To apply Price Rules and Volume Discounts to Sales Orders, please see Applying Volume Discounts and Price Rules on Handheld Device).
 Note
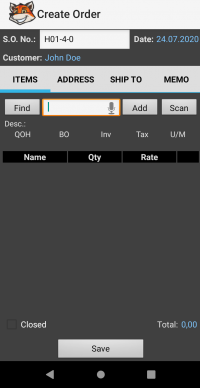
 The information string above the grid gives the information about the item choosed:
 *Description – sales description
 *U/M – unit of measure abbreviation ("NONE" is shown if U/M Set is not defined). The user is able to change the U/M by long-tapping on the U/M field. Qty and Rate values for the item will be recalculated based on the selected unit of measure.
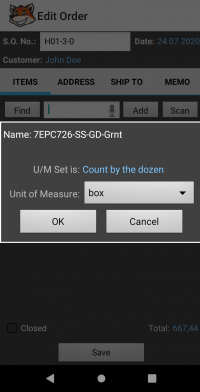
To change the Unit Of Measure for items in Sales Orders, open Sales Order, tap the Edit button and tap U/M data. Use the drop-down menu to choose a Unit of Measure and tap the OK button.
 *BO – back ordered quantity (difference between ordered quantity and invoiced quantity, equals 0 if the ordered quantity is less than the invoiced quantity). If the sales order and the linked invoice are created in QuickBooks, then after editing the invoice on the handheld, the back ordered quantity is not changed.
 *Invoiced – invoiced quantity. If sales order and linked invoice are created in QuickBooks, then after editing the invoice on the handheld, the invoiced quantity is not changed.

 Total field, shown at the bottom of the Items page, is calculated based on the order items’ Qty, Rate and taxes.
Customer Center
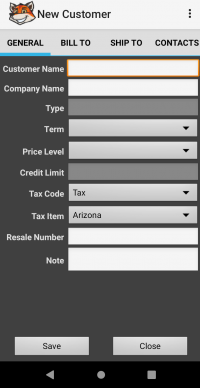
Edit Customer
- Create New Customer: On the app, go to Main → Sales → New.
- Edit Customer: On the app, go to Main → Sales
- General tab consists of following fields: Customer Name, Company Name, Type, Term, Price Level, Credit Limit, Release Number, Note.
- Bill to tab (customer’s billing address information) consists of following fields: Address, City, State, Zip, Country, Note.
- Ship to tab (customer’s shipping information) consists of following fields: Address, City, State, Zip, Country, Note.
- Contacts tab (customer’s contact information) consists of following fields: Mr./Ms./…, First Name, M.I., Last Name, Contact, Phone, Fax, Alt. Phone, Alt. Contact, E-mail.
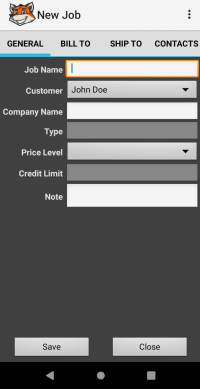
Edit Job
- Create New Job: In the mobile app, go to Main → Sales. Type the name of the customer, tap on it and choose Add Job.
- General tab consists of following fields: Job Name, Customer, Company Name, Type, Price Level, Credit Limit, Note.
- Bill to tab (customer’s billing address information) consists of following fields: Address, City, State, Zip, Country, Note.
- Ship to tab (customer’s shipping information) consists of following fields: Address, City, State, Zip, Country, Note.
- Contacts tab (customer’s contact information) consists of following fields: Mr./Ms./…, First Name, M.I., Last Name, Contact, Phone, Fax, Alt. Phone, Alt. Contact, E-mail.
Reviewing and Editing Sales Orders
HandiFox allows editing sales orders on the handheld device.
- In the app, go to Main → Sales.
- Fill the name of customer you want create sales order for and choose it in the list.
- Tap Customer Orders, then Edit to create sales order.
- Make all the changes needed. Edit Qty and Rate columns with data or add new items by tapping Find and Add.
- Tap Save.
 HandiFox only allows editing open orders.
  Item Location
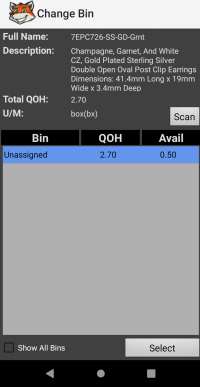
  Every item on the order can get a bin location where the items will be taken from. You can change that location if necessary.
  1. Long-tap the item and select the Change Bin option.
  2. Open the full list of bins by checking the Show All Bins checkbox.
  3. Tap on the desired bin to highlight it and then tap Select.
  You can select multiple bins and specify a quantity for each of them separately.
  1. Long-tap the item and select Edit.
  2. Enter the quantities per bin location (use the link at the bottom to add bins on the list).
 Applying Price Level
 To apply a price level to an item, long-tap it and select Apply Price Level entry from the pop-up menu.
 ! The “Apply Price Level” entry is disabled if there are no Price Levels associated with this item.

 The Price Level dropdown list is filled with price levels:
 - Base Sales Price
 - All Fixed % - price levels configured in the system
 - “Per Item” - price levels where item's custom price is defined

 Current Rate field shows the current item's rate.
 New Rate field shows the item's rate after applying price level.
 ! Only active price levels are displayed in Select Price Level
 Pick/Pack Sales Orders
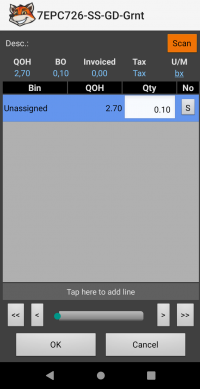
 You can pick/pack items by tapping on Pick or Pack button on the Customer Orders screen (see Picking and Packing Sales Orders).
 Select Unit of Measure
 The user is able to select a unit of measure from the unit of measure set assigned to the inventory item.
 Qty and Rate values are recalculated based on the selected unit of measure.

 When the screen opens, the U/M currently selected for the item is highlighted.
 The following information is shown:
  •U/M Set Name
  •Base Unit
    Name
    Abbreviation
Printing and Emailing Existing Sales Orders
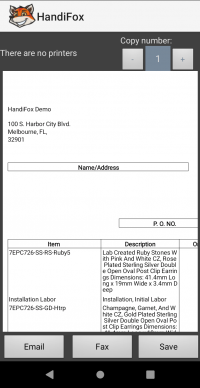
You can print Sales Orders from the handheld device.
- In the app, go to Main → Sales.
- Fill the name of the customer whose sales order you want to print and select it from the list.
- Tap Open Orders and then tap the context Menu button at the top right corner (
).
- Tap Print and choose the number of copies you need.
- Choose a printer in the top left corner and tap Print Sales Order.
or
- In the app, go to Main → Sales.
- Fill the name of the customer whose sales order you want to print and select it from the list.
- Tap Open Orders and then tap the context Menu button at the top right corner (
).
- Tap Print and choose the number of copies you need.
- Choose a printer in the top left corner and tap Print Sales Order.
You can send Sales Order via e-mail from the mobile app on your device.- In the app, go to Main → Sales.
- Fill the name of the customer whose sales order you want to print and select it from the list.
- Tap Open Orders' and then tap the context Menu button at the top right corner (
).
- Tap Print and then Email .
- Fill the Email field with the e-mail address you want send the sales order to, fill Subj field and empty field if it's needed. Tap Send.
or
- In the app, go to Main → Sales.
- Fill the name of the customer whose sales order you want to print and select it from the list.
- Tap Open Orders and then tap the context Menu button at the top right corner (
).
- Tap Print and then Email.
- Fill the Email field with the e-mail address you want send the sales order to, fill Subj field and empty field if it's needed. Tap Send.
Cloning Sales Orders
HandiFox allow users to clone open sales orders for different needs.
- In the mobile app, go to Main → Sales.
- Fill the name of customer you want create or edit sales order for and choose it in the list.
- Tap Open Orders button and long tap it.
- Tap Clone Sales Order
- Change the data in the screen if it is needed and tap 'Save.
or
- In the mobile app, go to Main → Sales.
- Fill the name of customer you want create or edit sales order for and choose it in the list.
- Tap Customer Orders button and long tap it.
- Tap Clone Sales Order.
- Change the data in the screen if it is needed and tap Save.
Printing Sales Orders
HandiFox allows users to print Sales Orders on the desktop.
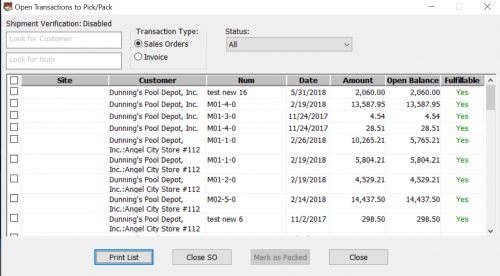
- In QuickBooks, go to File → HandiFox → Open Transactions to Pick/Pack.
- Choose Sales Order in the Transaction Type section.
- Check any sales orders in the list.
- Click Print List and then click OK on the Print screen.
Saving Sales Orders Report
- In QuickBooks, go to File → HandiFox → Open Transactions to Pick/Pack.
- Choose Sales Order in the Transaction Type section.
- Check any Sales Order in the list.
- Click on Print List.
- Check the Print to File checkbox and click on OK.
- Choose folder you want your report save to and click on OK.
Closing Sales Orders
- In the app, go to Main → Sales.
- Fill the name of customer you want to close sales order for and choose it in the list.
- Tap Customer Orders button and choose any sales order you need to close.
- Tap Edit button and check the Closed checkbox.
- Tap Save.
or
- In QuickBooks, go to File → HandiFox → Open Transactions to Pick/Pack.
- Choose Sales Order in the Transaction Type section..
- Click on Close SO and then on Yes.
Invoicing Sales Orders
- In the mobile app, go to Main → Sales.
- Fill the name of customer you want to invoice sales order for and choose it in the list.
- Tap Customer Orders button and choose any sales order you need to invoice via checking it.
- Tap Invoice button, then tap Save.
- Fill in your name in the Customer Name field and tap Enter Sign.
- Sign in the white box and tap OK.
- Tap Save.
