Difference between revisions of "QuickBoooks Connection and QuickBooks Synchronization"
Hermosillo.c (talk | contribs) |
Hermosillo.c (talk | contribs) |
||
| Line 28: | Line 28: | ||
<br> | <br> | ||
'''Note:''' <br> After launching '''ComAdapter''', you can trigger the QuickBooks synchronization by either synchronizing a handheld device (depending on the HandiFox settings) or by restarting the QuickBooks connection. To restart the connection: right-click the HandiFox icon near the clock, select '''''Stop QuickBooks Connection''''', and then right-click again and select '''''Start QuickBooks Connection'''''. | '''Note:''' <br> After launching '''ComAdapter''', you can trigger the QuickBooks synchronization by either synchronizing a handheld device (depending on the HandiFox settings) or by restarting the QuickBooks connection. To restart the connection: right-click the HandiFox icon near the clock, select '''''Stop QuickBooks Connection''''', and then right-click again and select '''''Start QuickBooks Connection'''''. | ||
| − | By default, if HandiFox is running in multi-user mode, QuickBooks synchronization occurs every hour, but this interval can be changed in File → HandiFox → Settings → Advanced. | + | By default, if HandiFox is running in multi-user mode, QuickBooks synchronization occurs every hour, but this interval can be changed in ''File → HandiFox → Settings → Advanced''. |
<br> | <br> | ||
Latest revision as of 16:21, 29 August 2025
This section covers common issues and solutions related to connecting HandiFox to QuickBooks and synchronizing data between QuickBooks and HandiFox.
Restore the Connection Between HandiFox and QuickBooks
Problem: Sometimes you may notice that transactions or other data created or updated on handheld devices:
- Do not upload to QuickBooks
- Do not download from QuickBooks to the handheld device
- Warning messages in HandiFox Monitor, such as:
 *Connecting to QuickBooks under user x (repeated several times without connecting)
 *Cannot connect to QuickBooks
 *Cannot connect to ComAdapter.exe
These issues indicate that HandiFox is having trouble connecting to QuickBooks through the ComAdapter.
Solution: Restoring the connection is straightforward by restarting the ComAdapter (ComAdapter.exe).
Steps:
- Open Task Manager on your computer.
- Go to the Details tab.
- Locate ComAdapter.exe in the list of processes.
- Right-click ComAdapter.exe and select End Task or End Process Tree.
- Navigate to the HandiFox installation folder (usually C:\Program Files (x86)\Tecom Group\HandiFox)
- Launch ComAdapter.exe manually by double-clicking the file.
Note:
After launching ComAdapter, you can trigger the QuickBooks synchronization by either synchronizing a handheld device (depending on the HandiFox settings) or by restarting the QuickBooks connection. To restart the connection: right-click the HandiFox icon near the clock, select Stop QuickBooks Connection, and then right-click again and select Start QuickBooks Connection.
By default, if HandiFox is running in multi-user mode, QuickBooks synchronization occurs every hour, but this interval can be changed in File → HandiFox → Settings → Advanced.
Go to Troubleshooting
QuickBooks Permission Errors
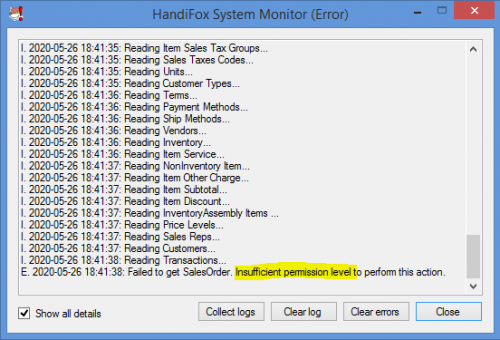
If you see error messages like:
"Failed to get ... Insufficient permission level to perform this action"
It means the current logged-in QuickBooks user lacks the minimum permissions required for HandiFox to function properly.
Solution:
Log in as a QuickBooks Admin and grant the necessary permissions to the users who log in to the company file on the computer where HandiFox is installed.
Granting new permissions can be done via Company → Users → Set Up Users and Roles...
Below is a summary of the minimum permissions a QuickBooks user should have to ensure the proper functioning of HandiFox.
List of Permissions
| Area | Activities | Access Level |
|---|---|---|
| ACCOUNTING | ||
| General Journal | VIEW | |
| BANKING | ||
| Checks | VIEW | |
| Credit card charges | VIEW | |
| CENTERS | ||
| Customer center | FULL | |
| Vendor center | FULL | |
| CUSTOMERS & RECEIVABLES | ||
| Credit card refunds | VIEW | |
| Credit Memos | FULL | |
| Invoices | FULL | |
| Receive Payments | FULL | |
| Sales Orders | FULL | |
| Sales Receipts | FULL | |
| Statement Charges | VIEW | |
| Area | Activities | Access Level |
|---|---|---|
| LISTS | ||
| Chart of Accounts | VIEW (without balances) | |
Customer & Vendor Profile:
|
| |
| Inventory Site List | FULL | |
| Item List | FULL | |
| Other Names List | VIEW | |
| Price Level List | VIEW | |
| Price Rule List | VIEW | |
| SALES TAX | ||
| Sales Tax Code List | VIEW | |
| VENDORS & PAYABLES | ||
| Adjust Quantity on Hand | FULL | |
| Build Assemblies | FULL | |
| Enter Bills | VIEW | |
| Item Receipts | FULL | |
| Purchase Orders | FULL | |
| Transfer Inventory | FULL | |
Go to Troubleshooting
HandiFox Cannot Find the QuickBooks Company File After It Was Renamed or Moved
If you have renamed or moved your QuickBooks company file, HandiFox may not be able to locate it. The good news is that this is an easy fix. By updating one setting in the HandiFox.ini file and restarting the connections in the correct order, you can point HandiFox to the right company file and continue syncing with QuickBooks.
Step 1. Get the QuickBooks company file path
- Open QuickBooks.
- Press F2 or Ctrl+1 to open the Product Information window.
- Find and copy the full path to your company file under File Information.
Step 2. Open the HandiFox configuration file
- Locate the file named HandiFox.ini. By default, this file is stored in the HandiFox installation folder, usually C:\Program Files (x86)\Tecom Group\HandiFox.
- Open the file with a text editor such as Notepad.
Step 3. Update the path to the QuickBooks company file
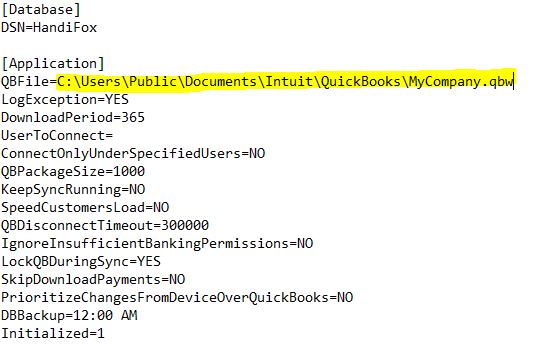
- In the HandiFox.ini file, go to the section [Application].
- Find the parameter QBFile=.
- After the equal sign =, paste the QuickBooks company file path you copied in Step 1. Do not add any spaces after the equal sign.
Step 4. Save the configuration file
- Save your changes and close the text editor.
Step 5. Restart the HandiFox connections
- Locate the HandiFox icon near the clock in the Windows system tray.
- Right-click the icon and select Stop QuickBooks Connection.
- Right-click the icon again and select Stop Handheld Connection.
- Right-click the icon again and select Start Handheld Connection.
- Right-click the icon again and select Start QuickBooks Connection.
Go to Troubleshooting
How to Launch Task Manager
Option 1: Keyboard Shortcut (Fastest)
- Press Ctrl + Shift + Esc simultaneously.
Option 2: Ctrl + Alt + Delete Screen
- Press Ctrl + Alt + Delete simultaneously.
- Select Task Manager from the menu.
Option 3: Right-Click Taskbar
- Right-click an empty area on the taskbar.
- Select Task Manager from the context menu.
Option 4: Start Menu Search
- Click Start or press the Windows key.
- Type Task Manager and press Enter or click the app.
Option 5: Run Dialog
- Press Windows key + R to open the Run dialog.
- Type taskmgr and press Enter.
Option 6: Command Prompt or PowerShell
- Open Command Prompt or PowerShell.
- Type taskmgr and press Enter.
Go to Troubleshooting


