Difference between revisions of "Troubleshooting"
Hermosillo.c (talk | contribs) |
Hermosillo.c (talk | contribs) |
||
| Line 4: | Line 4: | ||
<br> | <br> | ||
| − | == QuickBooks Permission Errors == | + | ==<big>QuickBoooks Connection and QuickBooks Synchronization</big>== |
| − | [[File:QBpermerror.PNG | left | 500px]]<br> | + | ===Restore the Connection Between HandiFox and QuickBooks=== |
| + | '''Problem:''' | ||
| + | Sometimes you may notice that transactions or other data created or updated on the handheld devices do not upload to QuickBooks, or do not download from QuickBooks to the handheld device, or in HandiFox Monitor you may see messages like: | ||
| + | *''Connecting to QuickBooks under user x'' (repeated several times without connecting) | ||
| + | *''Cannot connect to QuickBooks'' | ||
| + | *''Cannot connect to ComAdapter.exe'' | ||
| + | |||
| + | This indicates that HandiFox is having trouble connecting to QuickBooks through the ComAdapter. | ||
| + | |||
| + | '''Solution:''' | ||
| + | Restoring the connection is straightforward by restarting the ComAdapter (ComAdapter.exe). | ||
| + | |||
| + | '''Steps:''' | ||
| + | |||
| + | #Open '''Task Manager''' on your computer. | ||
| + | #Go to the '''Details''' tab. | ||
| + | #Locate '''ComAdapter.exe''' in the list of processes. | ||
| + | #Right-click '''ComAdapter.exe''' and select End Task or End Process Tree. | ||
| + | #Navigate to the HandiFox installation folder (usually C:\Program Files (x86)\Tecom Group\HandiFox) | ||
| + | #Launch '''ComAdapter.exe''' manually by double-clicking the file. | ||
| + | <br> | ||
| + | {{Warning | '''Note:''' | ||
| + | After performing this procedure, the HandiFox menu in QuickBooks will not respond. To restore access to HandiFox functions within QuickBooks, simply restart QuickBooks.}} | ||
| + | |||
| + | <br> | ||
| + | {{Gototop}} | ||
| + | <br> | ||
| + | |||
| + | ===QuickBooks Permission Errors=== | ||
| + | <br> | ||
| + | [[File:QBpermerror.PNG | left | 500px]] | ||
| + | <br> | ||
It is strongly recommended to log into QuickBooks as "Admin" or a user with Admin-like permissions. If you encounter a warning displaying ''Failed to get .... Insufficient permission level to perform this action'', it means the currently logged-in user lacks some of the minimum permissions required by QuickBooks to access data necessary for the proper functioning of HandiFox. | It is strongly recommended to log into QuickBooks as "Admin" or a user with Admin-like permissions. If you encounter a warning displaying ''Failed to get .... Insufficient permission level to perform this action'', it means the currently logged-in user lacks some of the minimum permissions required by QuickBooks to access data necessary for the proper functioning of HandiFox. | ||
Fixing this issue requires the Admin to grant read or full permissions to any user who logs in to QuickBooks on the computer on which HandiFox is installed. Granting new permissions can be done via ''Company → Users → Set Up Users and Roles...'' Below is a summary of the minimum permissions a QuickBooks user should have to ensure the proper functioning of HandiFox.<br> | Fixing this issue requires the Admin to grant read or full permissions to any user who logs in to QuickBooks on the computer on which HandiFox is installed. Granting new permissions can be done via ''Company → Users → Set Up Users and Roles...'' Below is a summary of the minimum permissions a QuickBooks user should have to ensure the proper functioning of HandiFox.<br> | ||
| Line 19: | Line 50: | ||
<br> | <br> | ||
<br> | <br> | ||
| − | === List of Permissions === | + | ====List of Permissions==== |
{|class="wikitable" style="border-style: solid; border-width: 10px 10px 10px 10px; display: inline-table"; | {|class="wikitable" style="border-style: solid; border-width: 10px 10px 10px 10px; display: inline-table"; | ||
|+ | |+ | ||
| Line 105: | Line 136: | ||
<br> | <br> | ||
| − | == <big>Handheld Synchronization</big> == | + | ==<big>Handheld Synchronization</big>== |
<br> | <br> | ||
{{Gototop}} | {{Gototop}} | ||
<br> | <br> | ||
| − | == <big>Scanning</big> == | + | ==<big>Scanning</big>== |
<br> | <br> | ||
| − | === Zebra Scanners === | + | ===Zebra Scanners=== |
==== Scanner not finding/locating items after reinstalling, updating or clearing the mobile app's data ==== | ==== Scanner not finding/locating items after reinstalling, updating or clearing the mobile app's data ==== | ||
[[File:Dw14.jpg | right | 250px]] | [[File:Dw14.jpg | right | 250px]] | ||
| Line 132: | Line 163: | ||
<br> | <br> | ||
{{Gototop}}<br> | {{Gototop}}<br> | ||
| − | ==== Known problems that may arise when testing if your scanner works in HandiFox ==== | + | ====Known problems that may arise when testing if your scanner works in HandiFox==== |
{| class="wikitable" | {| class="wikitable" | ||
|-style="font-style: italic; color: orange; text-align:center; border-style: solid; border-width: 2px 2px 2px 2px; | |-style="font-style: italic; color: orange; text-align:center; border-style: solid; border-width: 2px 2px 2px 2px; | ||
| Line 155: | Line 186: | ||
{{Gototop}}<br> | {{Gototop}}<br> | ||
| − | == <big>Miscellaneous</big> == | + | ==<big>Miscellaneous</big>== |
===Issues assigning device after reinstalling, updating or clearing data up=== | ===Issues assigning device after reinstalling, updating or clearing data up=== | ||
[[File:Assigndevice.gif|thumb|right|Select Site Looping]]<br> | [[File:Assigndevice.gif|thumb|right|Select Site Looping]]<br> | ||
| Line 181: | Line 212: | ||
[[File:Changesitepopup.PNG | 250px ]]<br> | [[File:Changesitepopup.PNG | 250px ]]<br> | ||
[[File:Reinstallchangesite.PNG |300px ]]<br> | [[File:Reinstallchangesite.PNG |300px ]]<br> | ||
| − | We recommend switching sites directly from the handheld device on the '''Synchronization''' screen to avoid having to reinstall the application or clear its data and, losing any unsynchronized data. Click [[Managing_Handheld_Devices#Switching_Sites.2FLocations_on_the_Handheld_Device|here]] to know more about Switching Sites. }} | + | We recommend switching sites directly from the handheld device on the '''Synchronization''' screen to avoid having to reinstall the application or clear its data and, losing any unsynchronized data. Click [[Managing_Handheld_Devices#Switching_Sites.2FLocations_on_the_Handheld_Device|here]] to know more about Switching Sites.}} |
<br> | <br> | ||
<br> | <br> | ||
{{Gototop}} | {{Gototop}} | ||
<br> | <br> | ||
| + | |||
| + | ==How to Launch Task Manager== | ||
| + | '''Option 1: Keyboard Shortcut (Fastest)''' | ||
| + | *Press Ctrl + Shift + Esc simultaneously. | ||
| + | |||
| + | '''Option 2: Ctrl + Alt + Delete Screen''' | ||
| + | *Press Ctrl + Alt + Delete simultaneously. | ||
| + | *Select ''Task Manager'' from the menu. | ||
| + | |||
| + | '''Option 3: Right-Click Taskbar''' | ||
| + | *Right-click an empty area on the taskbar. | ||
| + | *Select ''Task Manager'' from the context menu. | ||
| + | |||
| + | '''Option 4: Start Menu Search''' | ||
| + | *Click Start or press the Windows key. | ||
| + | *Type ''Task Manager'' and press Enter or click the app. | ||
| + | |||
| + | '''Option 5: Run Dialog''' | ||
| + | *Press Windows key + '''R''' to open the Run dialog. | ||
| + | *Type ''taskmgr'' and press Enter. | ||
| + | |||
| + | '''Option 6: Command Prompt or PowerShell''' | ||
| + | *Open Command Prompt or PowerShell. | ||
| + | *Type ''taskmgr'' and press Enter. | ||
Revision as of 20:10, 26 August 2025
Contents
Installation
QuickBoooks Connection and QuickBooks Synchronization
Restore the Connection Between HandiFox and QuickBooks
Problem: Sometimes you may notice that transactions or other data created or updated on the handheld devices do not upload to QuickBooks, or do not download from QuickBooks to the handheld device, or in HandiFox Monitor you may see messages like:
 *Connecting to QuickBooks under user x (repeated several times without connecting)
 *Cannot connect to QuickBooks
 *Cannot connect to ComAdapter.exe
This indicates that HandiFox is having trouble connecting to QuickBooks through the ComAdapter.
Solution: Restoring the connection is straightforward by restarting the ComAdapter (ComAdapter.exe).
Steps:
- Open Task Manager on your computer.
- Go to the Details tab.
- Locate ComAdapter.exe in the list of processes.
- Right-click ComAdapter.exe and select End Task or End Process Tree.
- Navigate to the HandiFox installation folder (usually C:\Program Files (x86)\Tecom Group\HandiFox)
- Launch ComAdapter.exe manually by double-clicking the file.

Note: After performing this procedure, the HandiFox menu in QuickBooks will not respond. To restore access to HandiFox functions within QuickBooks, simply restart QuickBooks.
QuickBooks Permission Errors
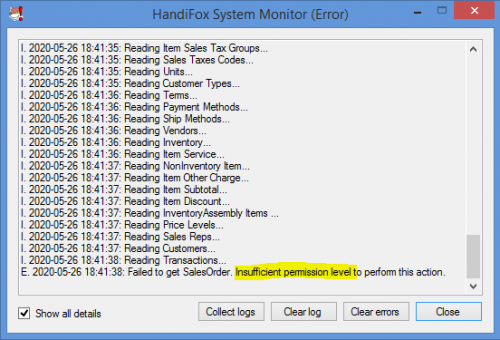
It is strongly recommended to log into QuickBooks as "Admin" or a user with Admin-like permissions. If you encounter a warning displaying Failed to get .... Insufficient permission level to perform this action, it means the currently logged-in user lacks some of the minimum permissions required by QuickBooks to access data necessary for the proper functioning of HandiFox. Fixing this issue requires the Admin to grant read or full permissions to any user who logs in to QuickBooks on the computer on which HandiFox is installed. Granting new permissions can be done via Company → Users → Set Up Users and Roles... Below is a summary of the minimum permissions a QuickBooks user should have to ensure the proper functioning of HandiFox.
List of Permissions
Area Activities Access Level ACCOUNTING General Journal VIEW BANKING Checks VIEW Credit card charges VIEW CENTERS Customer center FULL Vendor center FULL CUSTOMERS & RECEIVABLES Credit card refunds VIEW Credit Memos FULL Invoices FULL Receive Payments FULL Sales Orders FULL Sales Receipts FULL Statement Charges VIEW Area Activities Access Level LISTS Chart of Accounts VIEW (without balances) Customer & Vendor Profile: - Sales Rep List
- Terms List
- VIEW
- VIEW
Inventory Site List FULL Item List FULL Other Names List VIEW Price Level List VIEW Price Rule List VIEW SALES TAX Sales Tax Code List VIEW VENDORS & PAYABLES Adjust Quantity on Hand FULL Build Assemblies FULL Enter Bills VIEW Item Receipts FULL Purchase Orders FULL Transfer Inventory FULL
Handheld Synchronization
Scanning
Zebra Scanners
Scanner not finding/locating items after reinstalling, updating or clearing the mobile app's data
"I reinstalled/updated the mobile application or cleared the mobile application's data, and now the scanner won't locate or pick any items up"
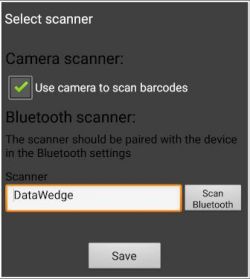
Assuming you didn't delete your HandiFox DataWedge Profile, all you need to do is "re-enable" your DataWedge profile.
Simply go to Admin → Settings → Select scanner, Make sure it says DataWedge in the input field to the left of the Scan Bluetooth button, Tap Save. Test you scanner again.
Known problems that may arise when testing if your scanner works in HandiFox
Problem Tips The scanner doesn't recognize the barcode at all (doesn't beep). The barcode label could be damaged or poorly printed, so it is not readable. Try another one. Also see the next problem. The scanner fails to recognize all or a large part of your product labels. Perhaps the correct decoder for your label type is not active. Go back to the profile in DataWedge, find the Barcode Input section and tap on Decoders. Enable more decoders (perhaps all of them, just in case). The scanner beeps when reading a barcode, but nothing happens in HandiFox (literally nothing at all). Double-check the settings of your HandiFox profile in DataWedge, especially the Intent Action Name - .

Intent Action Name: com.motorolasolutions.emdk.handifox.recvr (no spaces at the beginning or in between characters!) 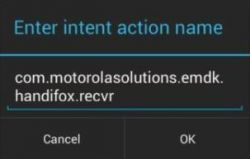
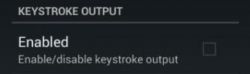
After scanning an item, its product code gets entered in the search field in HandiFox. Go back to the HandiFox profile in DataWedge and make sure Keystroke Output is disabled.
When scanning labels, HandiFox always gives the "Cannot find scanned item" message for all your products. You need to assign correct barcodes to your products in HandiFox. Click here to learn about assigning barcodes in HandiFox
Miscellaneous
Issues assigning device after reinstalling, updating or clearing data up
If you're unable to assign your handheld device after reinstalling or updating the handheld mobile application or clearing its data up and, the synchronization loops, prompting you to assign it to a site/location, you need to assign it to a specific site in HandiFox's Integrated Module. In QuickBooks, go to File → HandiFox → Handheld Device Manager, mark the checkbox on the left of the device to which you want to assign a site/location and, click on Change Site to assign the device to a specific site/location.
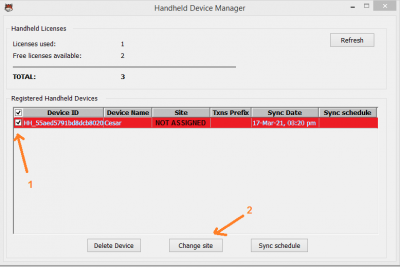
If the device's not highlighted in red and displays the name of site under the column Site and, you want to assign/changing it to a different site, the following warning will pop-up and, you'll need to reinstall the application or clear its data if you proceed with the operation (confirm) in order to continue synchronizing data.
We recommend switching sites directly from the handheld device on the Synchronization screen to avoid having to reinstall the application or clear its data and, losing any unsynchronized data. Click here to know more about Switching Sites.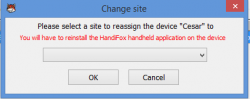

How to Launch Task Manager
Option 1: Keyboard Shortcut (Fastest)
- Press Ctrl + Shift + Esc simultaneously.
Option 2: Ctrl + Alt + Delete Screen
- Press Ctrl + Alt + Delete simultaneously.
- Select Task Manager from the menu.
Option 3: Right-Click Taskbar
- Right-click an empty area on the taskbar.
- Select Task Manager from the context menu.
Option 4: Start Menu Search
- Click Start or press the Windows key.
- Type Task Manager and press Enter or click the app.
Option 5: Run Dialog
- Press Windows key + R to open the Run dialog.
- Type taskmgr and press Enter.
Option 6: Command Prompt or PowerShell
- Open Command Prompt or PowerShell.
- Type taskmgr and press Enter.


