Difference between revisions of "Volume Discount and Price Rules"
Jump to navigation
Jump to search
Hermosillo.c (talk | contribs) |
Hermosillo.c (talk | contribs) |
||
| (32 intermediate revisions by the same user not shown) | |||
| Line 1: | Line 1: | ||
[[File:Prvd.png|400px|thumb|right|New Price Rule Window]] | [[File:Prvd.png|400px|thumb|right|New Price Rule Window]] | ||
| − | HandiFox allows users to | + | HandiFox allows users offer discounts or charge different rates that apply to, including but not limited to specific customers or, specific items or goods for a specific period of time, or even indefinitely, and set volume discounts which apply to all customers and are based on a minimum amount that incentivize your clients to purchase your goods in large quantities. |
| − | == Price rules == | + | ==[[File:comp.png | 36px]] Price rules == |
[[File:Prnew.PNG|400px|thumb|right|New Price Rule Window]] | [[File:Prnew.PNG|400px|thumb|right|New Price Rule Window]] | ||
| + | |||
===Price Rules Tab=== | ===Price Rules Tab=== | ||
* Create button: this button allows creating price rules. | * Create button: this button allows creating price rules. | ||
| Line 10: | Line 11: | ||
* Edit button: this button can be used to make changes to existing price rules | * Edit button: this button can be used to make changes to existing price rules | ||
* Close button: this button closes the '''Price Rules''' window. | * Close button: this button closes the '''Price Rules''' window. | ||
| + | <br> | ||
| + | {{Gototop}} | ||
| + | <br> | ||
===New Price Rule Window=== | ===New Price Rule Window=== | ||
* Name field: allows entering a name for new price rules. | * Name field: allows entering a name for new price rules. | ||
| Line 22: | Line 26: | ||
* Memo field: allows adding comments into the memo field. | * Memo field: allows adding comments into the memo field. | ||
* Item description: allows adding comments into the item description. | * Item description: allows adding comments into the item description. | ||
| − | == | + | <br> |
| + | {{Gototop}} | ||
| + | <br> | ||
| + | |||
| + | ==[[File:comp.png | 36px]] Creating Price Rules == | ||
# In QuickBooks, go to ''File → HandiFox → Price Rules''. | # In QuickBooks, go to ''File → HandiFox → Price Rules''. | ||
# Click on the '''''Create''''' button to start creating price rules. | # Click on the '''''Create''''' button to start creating price rules. | ||
| Line 37: | Line 45: | ||
# Click on '''''Save''''' to save the rule. | # Click on '''''Save''''' to save the rule. | ||
{{ info | If a condition was added by mistake, simply uncheck the box to the left of it to render it inactive.}} | {{ info | If a condition was added by mistake, simply uncheck the box to the left of it to render it inactive.}} | ||
| + | <br> | ||
| + | {{Gototop}} | ||
| + | <br> | ||
| − | == | + | ==[[File:comp.png | 36px]] Editing Price Rules == |
# In QuickBooks, go to ''File → HandiFox → Price Rules''. | # In QuickBooks, go to ''File → HandiFox → Price Rules''. | ||
# Choose any price rule you want to edit by clicking on it. | # Choose any price rule you want to edit by clicking on it. | ||
# Click on the '''Edit''' button to edit price rule. | # Click on the '''Edit''' button to edit price rule. | ||
# Make the desired changes and click on the '''Save''' button. | # Make the desired changes and click on the '''Save''' button. | ||
| − | == | + | <br> |
| + | {{Gototop}} | ||
| + | <br> | ||
| + | ==[[File:comp.png | 36px]] Making price rules inactive == | ||
# In QuickBooks, go to ''File → HandiFox → Price Rules''. | # In QuickBooks, go to ''File → HandiFox → Price Rules''. | ||
# Choose any price rule in the list you want to make inactive. | # Choose any price rule in the list you want to make inactive. | ||
| Line 50: | Line 64: | ||
# Click on the '''Save''' button. | # Click on the '''Save''' button. | ||
{{Info | Alternatively, you can make price rules inactive by unchecking the boxes to the left of each price rule in the '''Price Rules''' Window.}} | {{Info | Alternatively, you can make price rules inactive by unchecking the boxes to the left of each price rule in the '''Price Rules''' Window.}} | ||
| + | <br> | ||
| + | {{Gototop}} | ||
| + | <br> | ||
| − | ==Volume Discounts== | + | ==[[File:comp.png | 36px]] Volume Discounts== |
===Volume Discounts Tab=== | ===Volume Discounts Tab=== | ||
| Line 69: | Line 86: | ||
<br> | <br> | ||
<br> | <br> | ||
| + | {{Gototop}} | ||
<br> | <br> | ||
| − | |||
| − | |||
| − | |||
| − | |||
<br> | <br> | ||
<br> | <br> | ||
| + | ==[[File:comp.png | 36px]] Creating Volume Discounts == | ||
| + | '''<big>Set Volume Discount Window</big>''' | ||
| + | [[File:Setvoldiscwind.PNG|300px|thumb|right|Set Volume Discount Window]] | ||
* '''Add line''' button: allows adding lines to set volume discount for items. | * '''Add line''' button: allows adding lines to set volume discount for items. | ||
* '''Delete line''' button: allows to delete created line. | * '''Delete line''' button: allows to delete created line. | ||
* '''Save''' button: allows to save all the changes in volume discount setting. | * '''Save''' button: allows to save all the changes in volume discount setting. | ||
* '''Cancel''' button: allows to close Set Volume Discount screen. | * '''Cancel''' button: allows to close Set Volume Discount screen. | ||
| + | |||
<br> | <br> | ||
<br> | <br> | ||
<br> | <br> | ||
<br> | <br> | ||
| + | |||
| + | In QuickBooks, go to ''File → HandiFox → Price Rules → Volume Discounts''. | ||
| + | # Choose items by checking the boxes. | ||
| + | # Click on ''Set Volume Discount'' to set the discount for the selected items. | ||
| + | # Click on ''Add Line'', the columns with quantity and discount will appear. | ||
| + | # Enter the desired discount rate and quantity for items displayed. | ||
| + | # Click on ''Save'' to save all the changes. If you want to cancel the procedure, click on ''Cancel''. | ||
| + | {{Infoshort | You can remove any line by clicking on ''Delete Line''.}} | ||
<br> | <br> | ||
<br> | <br> | ||
| + | |||
| + | {{Gototop}} | ||
<br> | <br> | ||
<br> | <br> | ||
| − | + | ||
| − | + | ==[[File:comp.png | 36px]] Modifying Volume Discounts == | |
| − | + | '''<big>Edit Volume Discount Window</big>''' | |
| − | |||
| − | |||
| − | |||
| − | |||
| − | ==== Edit Volume Discount Window | ||
* '''Add Line''' button: allows adding line to set volume discount for item. | * '''Add Line''' button: allows adding line to set volume discount for item. | ||
* '''Delete Line''' button: allows deleting created line. | * '''Delete Line''' button: allows deleting created line. | ||
| Line 103: | Line 126: | ||
* '''Close''' button: this button closes the '''Price Rules''' Window. | * '''Close''' button: this button closes the '''Price Rules''' Window. | ||
[[File:Editvoldisc.PNG|500px|thumb|left|Edit Volume Discount Window]] | [[File:Editvoldisc.PNG|500px|thumb|left|Edit Volume Discount Window]] | ||
| − | + | ||
| − | |||
| − | |||
| − | |||
| − | |||
| − | |||
| − | |||
| − | |||
| − | |||
| − | |||
| − | |||
| − | |||
| − | |||
| − | |||
| − | |||
| − | |||
| − | |||
| − | |||
| − | |||
| − | |||
| − | |||
| − | |||
In QuickBooks, go to ''File → HandiFox → Price Rules → Volume Discounts''. | In QuickBooks, go to ''File → HandiFox → Price Rules → Volume Discounts''. | ||
# Choose items by checking the boxes. | # Choose items by checking the boxes. | ||
| Line 132: | Line 134: | ||
# Click on the '''Save''' button to save all the changes. | # Click on the '''Save''' button to save all the changes. | ||
# If you want to cancel the operation, click on the '''Cancel''' button. | # If you want to cancel the operation, click on the '''Cancel''' button. | ||
| − | == | + | <br> |
| + | <br> | ||
| + | <br> | ||
| + | {{Gototop}} | ||
| + | <br> | ||
| + | |||
| + | ==[[File:comp.png | 36px]] Deleting Volume Discounts == | ||
In QuickBooks, go to ''File → HandiFox → Price Rules → Volume Discounts''. | In QuickBooks, go to ''File → HandiFox → Price Rules → Volume Discounts''. | ||
# Choose items you want to delete via checking the boxes. | # Choose items you want to delete via checking the boxes. | ||
| Line 139: | Line 147: | ||
# Click on ''Delete Line'' to remove discount. | # Click on ''Delete Line'' to remove discount. | ||
# Click on ''Save'' to save all the changes. If you want to cancel the operation, Click on the '''Cancel''' button. | # Click on ''Save'' to save all the changes. If you want to cancel the operation, Click on the '''Cancel''' button. | ||
| + | <br> | ||
| + | {{Gototop}} | ||
| + | <br> | ||
| − | == Applying Volume Discounts and Price Rules on Handheld Device == | + | ==[[File:tabletandroid.png | 36px]] Applying Volume Discounts and Price Rules on Handheld Device == |
[[File:Bf1d7f777c3cc781141655d24b36de42.png|200px|thumb|left|Edit Item Screen with Price Adjustment section, displaying price rules and warning]] | [[File:Bf1d7f777c3cc781141655d24b36de42.png|200px|thumb|left|Edit Item Screen with Price Adjustment section, displaying price rules and warning]] | ||
# Go to ''Main menu → Sales'' on your device. | # Go to ''Main menu → Sales'' on your device. | ||
| Line 147: | Line 158: | ||
# Find the '''Price Adjustments''' section and choose any ''Volume Discount or Price Rule'' by checking it. | # Find the '''Price Adjustments''' section and choose any ''Volume Discount or Price Rule'' by checking it. | ||
# Tap the '''Close''' button to go back to the previous screen. | # Tap the '''Close''' button to go back to the previous screen. | ||
| + | <br> | ||
| + | {{Gototop}} | ||
| + | <br> | ||
Latest revision as of 23:06, 8 July 2021
HandiFox allows users offer discounts or charge different rates that apply to, including but not limited to specific customers or, specific items or goods for a specific period of time, or even indefinitely, and set volume discounts which apply to all customers and are based on a minimum amount that incentivize your clients to purchase your goods in large quantities.
Contents
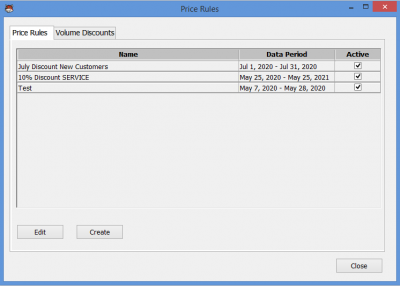
 Price rules
Price Rules Tab
- Create button: this button allows creating price rules.
- Active box: allows enabling/disabling the price rule.
- Save button: allow saving changes to price rules.
- Cancel button: this button closes the window .
- Edit button: this button can be used to make changes to existing price rules
- Close button: this button closes the Price Rules window.
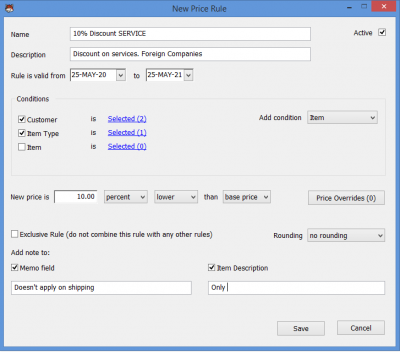
New Price Rule Window
- Name field: allows entering a name for new price rules.
- Description field: allows entering a short description for the new price rules.
- Rule is valid from … to… box: allows setting the period in which the price rule is/will be active.
- Add condition drop-down menu: allows selecting conditions; customer, customer type, handheld user, inventory site, item, item type, preferred vendor, sales rep.
- New price is … box: allows setting rule for new price based on a specific amount of money or percentage.
- Price Overrides button: allows to set new price for any item.
- Exclusive rule box: allows restricting the combination of the rule with others rules.
- Rounding box: allows choosing the type of rounding for the price.
- Add note to
   * Memo field: allows adding comments into the memo field.
   * Item description: allows adding comments into the item description.
 Creating Price Rules
- In QuickBooks, go to File → HandiFox → Price Rules.
- Click on the Create button to start creating price rules.
- Enter a name for the price rule in the Name field.
- Enter a short description in the Description field.
- Set the interval in which you want the rule to be applicable. You can set Rule is Valid From box. (Omitting this step will create an indefinite rule).
- Create condition if you need using the Add Condition drop-down menu and clicking on the "Selected" link next to the newly added condition. *See note below.
- Set new price in the New Price Is field and select the desired parameter in the contiguous drop-down menus.
- Set the new price in the Price Overrides box. (OPTIONAL)
- Make the rule exclusive if you need by checking the Exclusive Rule box. (OPTIONAL)
- Choose how you would like to round the price up (or down) by checking the Rounding box. (OPTIONAL)
- Add a note in the Memo Field and Item Description. (OPTIONAL)
- Check the Active box to make the price rule active.
- Click on Save to save the rule.
 Editing Price Rules
- In QuickBooks, go to File → HandiFox → Price Rules.
- Choose any price rule you want to edit by clicking on it.
- Click on the Edit button to edit price rule.
- Make the desired changes and click on the Save button.
 Making price rules inactive
- In QuickBooks, go to File → HandiFox → Price Rules.
- Choose any price rule in the list you want to make inactive.
- Click on the Edit button.
- Uncheck the "Active" box to make it inactive.
- Click on the Save button.
 Volume Discounts
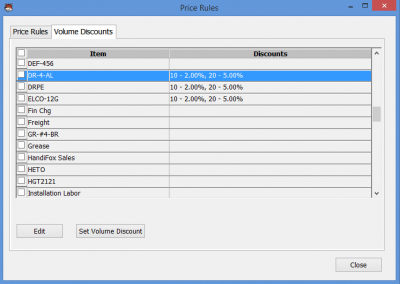
Volume Discounts Tab
- Set volume discount button: This button allows to create volume discount.
- Edit button: this button can be used to make changes to existing volume discounts.
- Close button: this button closes the Price Rules/Volume Discounts window.
 Creating Volume Discounts
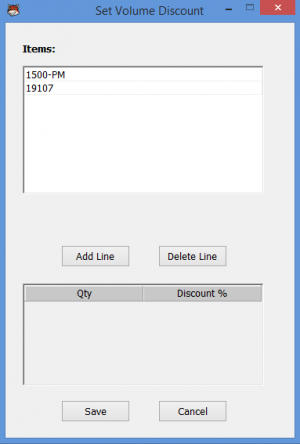
Set Volume Discount Window
- Add line button: allows adding lines to set volume discount for items.
- Delete line button: allows to delete created line.
- Save button: allows to save all the changes in volume discount setting.
- Cancel button: allows to close Set Volume Discount screen.
In QuickBooks, go to File → HandiFox → Price Rules → Volume Discounts.
- Choose items by checking the boxes.
- Click on Set Volume Discount to set the discount for the selected items.
- Click on Add Line, the columns with quantity and discount will appear.
- Enter the desired discount rate and quantity for items displayed.
- Click on Save to save all the changes. If you want to cancel the procedure, click on Cancel.
 Modifying Volume Discounts
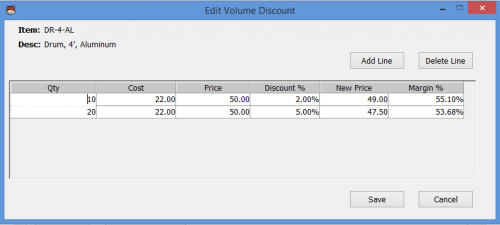
Edit Volume Discount Window
- Add Line button: allows adding line to set volume discount for item.
- Delete Line button: allows deleting created line.
- Save button: allows saving all the changes created.
- Cancel button: allows closing the Set Volume Discount window or canceling the operation.
- Close button: this button closes the Price Rules Window.
In QuickBooks, go to File → HandiFox → Price Rules → Volume Discounts.
- Choose items by checking the boxes.
- Click on Edit to modify the discount.
- Change quantity and discount rate.
- You can also add some new lines and set discounts for any other quantities. Click on the Add Line button and a new line will appear.
- Click on the Save button to save all the changes.
- If you want to cancel the operation, click on the Cancel button.
 Deleting Volume Discounts
In QuickBooks, go to File → HandiFox → Price Rules → Volume Discounts.
- Choose items you want to delete via checking the boxes.
- Click on Edit to modify the discount.
- Click on the line you want to delete.
- Click on Delete Line to remove discount.
- Click on Save to save all the changes. If you want to cancel the operation, Click on the Cancel button.
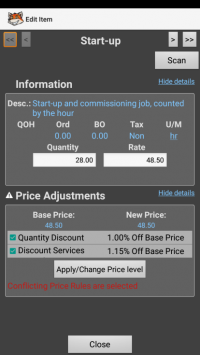
 Applying Volume Discounts and Price Rules on Handheld Device
- Go to Main menu → Sales on your device.
- Edit any Sales Order or Invoice you need, or create a new one.
- While editing or creating a Sales Transaction, tap on
to the right of the item line to open the Edit Item screen.
- Find the Price Adjustments section and choose any Volume Discount or Price Rule by checking it.
- Tap the Close button to go back to the previous screen.
