Difference between revisions of "Invoicing"
Jump to navigation
Jump to search
Posokhina.a (talk | contribs) |
Posokhina.a (talk | contribs) |
||
| Line 16: | Line 16: | ||
=View Invoice in the app= | =View Invoice in the app= | ||
| − | [[File: | + | [[File:Open invoices list.png|200px|thumb|left| '''Open Invoices List''']] |
| − | |||
#In the app, go to Main → Sales. | #In the app, go to Main → Sales. | ||
#Type customer's name in '''Look for customer''' field. | #Type customer's name in '''Look for customer''' field. | ||
Revision as of 15:48, 7 September 2020
With HandiFox you can create Invoices, documents issued by a seller to the buyer, which are consisting of information about a sale or products, including the quantities, costs etc.
Contents
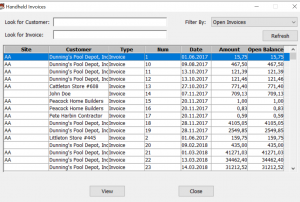
View/Print Invoice window on the desktop
- Look for Customer field: It allows looking for invoice for specific customer.
- Look for Invoice field: It allows looking for invoice by its name.
- Filter by drop-down menu: It allows showing different types of invoices.
- Refresh button: It allows refreshing settings.
- View button: It allows viewing invoice report.
- Print button: It allows printing invoice report.
- Close button: It allows closing invoice report.
- Close button: It allows closing view/print window.
View Invoice in the app
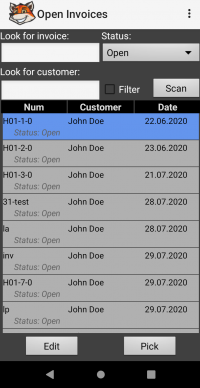
- In the app, go to Main → Sales.
- Type customer's name in Look for customer field.
- Tap Open Invoices button to see the list of invoices, use Status drop-down menu to set type of invoices you want to see.
You can create Pick/Pack Invoice in menu opening via long-click on invoice in invoice list (see:).
The Open Invoices window allows viewing the list of open Invoices that can be Picked and Packed. The list displays all open Invoices for the Main location that haven't been applied any payments or credits. It will not show invoices created through Sales Orders.
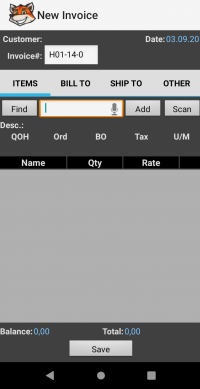
New Invoice Screen
HandiFox easily allows creating Invoices in the app.
- Items tab: allows editing the invoice items with Name, Qty (invoiced quantity) and Rate fields.
- Description– sales description
- S.O.No. - RefNumber of the sales order, which the invoice item is linked to. Empty for invoice items that are not linked to sales orders.
- Ord – ordered quantity. Empty for invoice items that are not linked to sales orders or when invoice is created in QuickBooks and linked to a sales order.
- BO – backordered quantity. Empty for invoice items that are not linked to sales orders or when invoice is created in QuickBooks and linked to a sales order.
- U/M – unit of measure abbreviation ("NONE" is shown if U/M Set is not defined). The user is able to change the U/M by clicking on the U/M field. The Select Unit of Measure window appears allowing user to select a unit of measure from unit of measure set assigned to the inventory item. Qty and Rate values for the item will be recalculated based on the selected unit of measure.
Note: If handheld synchronizes for the first time and downloads the Invoice and unit of measure's conversion ratio is changed for an invoice's item in QuickBooks then “[NONE]” is shown as unit of measure. If handheld synchronizes for the first time after HandiFox initialization and downloads the Invoice and unit of measure set is changed for an invoice's item in QuickBooks then unit of measure’s abbreviation is shown in brackets. If invoice is already present on the handheld and unit of measure set or unit of measure's name, abbreviation or conversion ratio are changed for an invoice's item in QuickBooks then unit of measure name is shown in brackets.
- The Balance Due field on the bottom of the Items page shows the balance due for the invoice (difference between Total amount and amount of payments applied for the invoice). It is recalculated based on the invoice items’ Qty, Rate and taxes
- Bill To tab:The tab has Bill address field. If invoice is created based on sales orders, then Bill address field is populated with the Address from the order, for which items were added last, otherwise with the customer's bill address. You can edit the bill address. Changes will be applied to the current invoice only. You can change the bill address for the customer in the Edit Customer window.
- Ship to tab:The tab has Ship address field.If invoice is created based on sales orders, then Ship address field is populated with the Address from the order, for which items were added last, otherwise with the customer's bill address. You can edit the ship address. Changes will be applied to the current invoice only. You can change the ship address for the customer in the Edit Customer window.
- Other tab:
- P.O.No. – editable field, up to 25 characters. When New Invoice window is opened to create the invoice based on sales orders, then the P.O.No.is populated with the P.O.No. from the order for which the invoice is created. P.O.No is empty otherwise.
- Memo - editable field, up to 100 characters
- Terms - dropdown list populated with active terms configured in QuickBooks. When the New Invoice window is opened the customer’s term is selected by default (even if it's not active)
- Customer Signature, not shown on the New Invoice window (not editable) or Take customer’s signature system setting is unselected.
Creating New Invoice
On HandiFox app you can create invoices.
- In the app, go to Main → Sales.
- Fill the name of customer you want create invoice for.
- Tap Invoice button.
- Tap Find button, use Scan or Add button with field for item name to find item.
- Tap Save button and type item quantity and rate in Qty and Rate columns.
- Tap Save button.
- Fill in your name in Customer Name field and click Enter Sign.
- Sign in the white box appeared and click OK.
- Tap Save.
or
- In the app, go to Main → Sales.
- Fill the name of customer you want create invoice for.
- Click Customer Orders button.
- Choose any Sales Order in the list you want to invoice via checking it.
- Tap Invoice button.
- Change the name of the invoice if its needed via typing it into Invoice#: field.
- Add some new items using Find button, Add button or Scan.
- Change the quantity and rate via typing them manually in Qty and Rate fields if it's needed.
- Tap Save button, the Customer Signature screen will appear.
- Type customer's name in Customer Name: field.
- Tap Enter Sign button and sign in the box.
- Tap OK and then Save button.
Editing Invoice
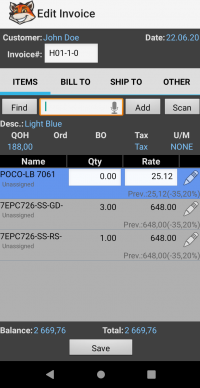
In HandiFox app you can edit invoices.
- In the app, go to Main → Sales.
- Fill the name of customer you want edit invoice for.
- Click Open Invoices button.
- Choose any invoice in the list and click Edit.
- Change quantity and rate or add some new items if it’s needed.
- Click Save.
When Edit Invoice window is opened for an invoice, created not by the current location, then the user cannot make any changes. Invoices created in QuickBooks can be edited on Main location.
Printing Invoice
HandiFox allows printing invoices both on the app and desktop.
- In QuickBooks, go to File → HandiFox → View Print/Invoice.
- Click invoice you want to print.
- Click View button and click Print.
- Click OK to print the report.
- In the app, go to Main → Sales.
- Type the customer's name you want to email invoice for in Look for customer field and tap Open Invoices button to open Open Invoices screen.
- Tap any Invoice you want to send in email and tap Menu button in the right up corner of the screen.
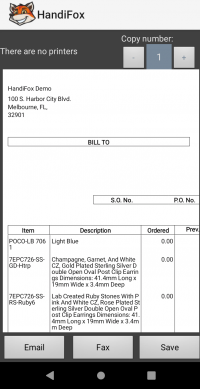
- Tap Print button and choose the number of copies you need.
- Choose printer in the left top corner and tap Print Invoice.
Saving Invoice
HandiFox allows saving invoices in file on your computer.
- In QuickBooks, go to File → HandiFox → View Print/Invoice.
- Click invoice you want to print.
- Click View button and click Print.
- Check Print to File checkbox and click OK.
- Choose folder you want your report save to and click OK.
Save in the app
Emailing Invoice
With handiFox you can send invoices via email.
- In the app, go to Main → Sales.
- Type the customer's name you want to email invoice for in Look for customer field and tap Open Invoices button to open Open Invoices screen.
- Tap any Invoice you want to send in email and tap popup button in the top right corner.
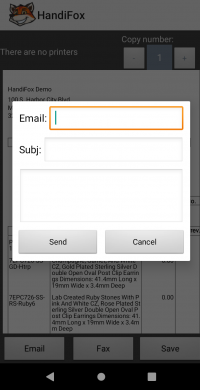
- Tap Print button and then tap Email button to create the email.
- Type the recepient's address in Email field, type subject in Subj field, and write any info in the empty field if it is needed.
- Tap Send button to send email with invoice.
