Difference between revisions of "Multi-Location and Bins"
Hermosillo.c (talk | contribs) |
Hermosillo.c (talk | contribs) |
||
| Line 26: | Line 26: | ||
The '''Bin is Inactive''' checkbox defines whether current bin is active/inactive. Check it to make the bin inactive, and uncheck it to activate the bin again. | The '''Bin is Inactive''' checkbox defines whether current bin is active/inactive. Check it to make the bin inactive, and uncheck it to activate the bin again. | ||
| − | Tap the '''Save''' button to apply the changes you've made and return to the previous screen. If you don't want to save the changes, press the Back (← or <) key on the device and then tap '''No''' in the shown dialog window. | + | Tap the '''Save''' button to apply the changes you've made and return to the previous screen. If you don't want to save the changes, press the Back (← or <) key on the device and then tap '''No''' in the shown dialog window.<br> |
| + | <br> | ||
| + | <br> | ||
| + | <br> | ||
| + | <br> | ||
| + | <br> | ||
| + | <br> | ||
| + | <br> | ||
| + | <br> | ||
| + | <br> | ||
| + | <br> | ||
| + | <br> | ||
| + | <br> | ||
| + | <br> | ||
| + | <br> | ||
| + | <br> | ||
| + | <br> | ||
| + | |||
| + | ==Adding, Editing and Removing Bins in Sales Transactions== | ||
| + | HandiFox gives you the ability to work with bins in Sales transactions; Sales Orders and Invoices. | ||
| + | To assign a bin to a specific item in a sales transaction simply long-press the item you want to assign a bin to, and tap on '''Edit''' in the popup window. Tap on the bottom of the Item screen on "Tap here to add line".<br> | ||
| + | [[File:Addeditbins.PNG|300px|left]] [[File:Selbins.PNG|300px|right]] | ||
| + | [[File:Infocircle.png | 20px]] ''The first line displayed shows the bin selected by default, to change it, simple long-press on it and, tap '''Change bin''' on in the popup window''.<br> | ||
| + | <br> | ||
| + | |||
| + | {{Infoshort | ''You can '''delete''' any bin on this screen by long-pressing the the bin line you wish to delete, to change it, simple long-press on it and, tap '''Change bin''' on in the popup window''.}}<br> | ||
| + | |||
| + | [[File:Infocircle.png | 20px]] To '''Change''' a bin simply long-press on the item to which you want to change the bin and follow the instructions mentioned above. | ||
| + | <br> | ||
| + | <br> | ||
| + | |||
| + | {{Infoshortorange | ''You can use the following buttons [[File:Botonesflechas.PNG | 300px]] to navigate accross the items contained in your sales transaction.}} | ||
Revision as of 17:28, 21 July 2020
Contents
Sites
Bins
Bin Locations
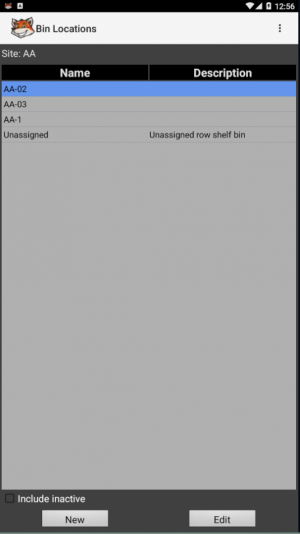
The Bin Locations screen allows you to manage bin locations for the current inventory site.
This screens lists all active bin locations that exist within the current inventory site.
- Include Inactive checkbox defines whether inactive bin locations are shown on the list.
- New button allows you to create a new bin location using the New Bin Location window.
- Edit button allows you to edit currently highlighted bin location using Edit Bin Location window.
Creating and Editing Bins on the Handheld Device
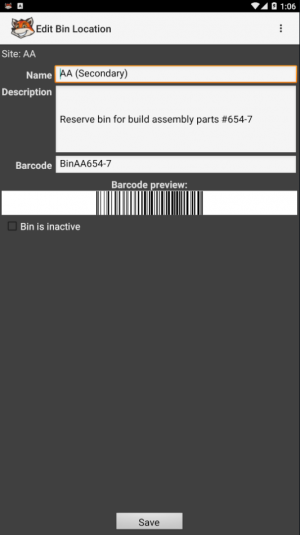
The New/Edit Bin Location screen allow the user to create a new bin location or edit an existing one.
Use the appropriate fields to edit the Name and Description of the bin you are creating/editing.
Bin locations can be assigned a barcode to be used to indicate them through scanning, when applicable. To assign a barcode to the bin, use the Barcode field to enter the sequence manually, scan a barcode with your wireless scanner, or use the Scan button to scan a barcode with device's camera (see Scanning Barcodes). The Bin is Inactive checkbox defines whether current bin is active/inactive. Check it to make the bin inactive, and uncheck it to activate the bin again.
Tap the Save button to apply the changes you've made and return to the previous screen. If you don't want to save the changes, press the Back (← or <) key on the device and then tap No in the shown dialog window.
Adding, Editing and Removing Bins in Sales Transactions
HandiFox gives you the ability to work with bins in Sales transactions; Sales Orders and Invoices.
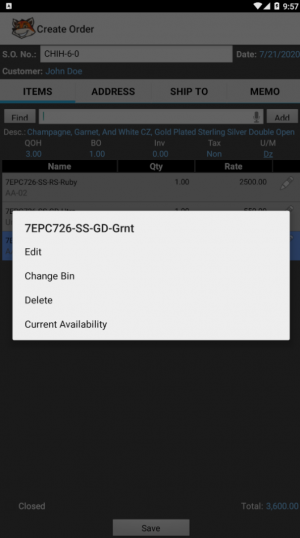
To assign a bin to a specific item in a sales transaction simply long-press the item you want to assign a bin to, and tap on Edit in the popup window. Tap on the bottom of the Item screen on "Tap here to add line".
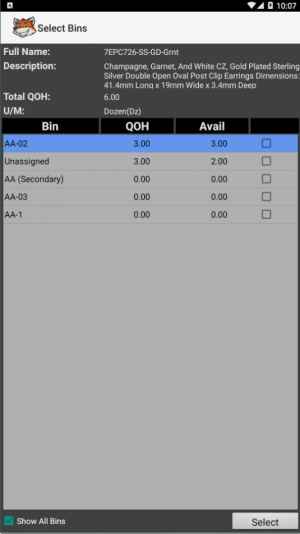
![]() The first line displayed shows the bin selected by default, to change it, simple long-press on it and, tap Change bin on in the popup window.
The first line displayed shows the bin selected by default, to change it, simple long-press on it and, tap Change bin on in the popup window.

You can delete any bin on this screen by long-pressing the the bin line you wish to delete, to change it, simple long-press on it and, tap Change bin on in the popup window.
![]() To Change a bin simply long-press on the item to which you want to change the bin and follow the instructions mentioned above.
To Change a bin simply long-press on the item to which you want to change the bin and follow the instructions mentioned above.


