Difference between revisions of "Mobile Application Interface"
Hermosillo.c (talk | contribs) |
Hermosillo.c (talk | contribs) |
||
| Line 9: | Line 9: | ||
<br> | <br> | ||
* '''Inventory button''' | * '''Inventory button''' | ||
| − | Tap it to open the Inventory screen from where '''[[Managing_Inventory#Item_List|Item List]]''', '''[[Inventory_Counting#Inventory_Counting_Screen_on_Handheld_Device|Inventory Counting]]''', '''[[Purchasing#P.O._Center|P.O. Center]]''' and '''[[Multi-Location_and_Bins#Bins|Bin Locations]]''' | + | Tap it to open the Inventory screen from where '''[[Managing_Inventory#Item_List|Item List]]''', '''[[Inventory_Counting#Inventory_Counting_Screen_on_Handheld_Device|Inventory Counting]]''', '''[[Purchasing#P.O._Center|P.O. Center]]''' and '''[[Multi-Location_and_Bins#Bins|Bin Locations]]''' screens are available.<br> |
* | * | ||
* '''Sales button''' | * '''Sales button''' | ||
| − | Tap it to open the [[Mobile_Application_Interface#Customer_Center_Screen|Customer Center]] screen.<br> | + | Tap it to open the '''[[Mobile_Application_Interface#Customer_Center_Screen|Customer Center]]''' screen.<br> |
* '''Transfer button''' | * '''Transfer button''' | ||
Revision as of 19:43, 5 July 2021
Mobile Application Interface
Contents
Login Screen
Main Screen
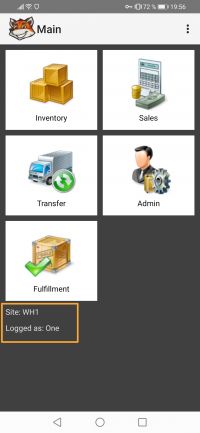
The Main window is opened after a successful login.
The location (site) the device is assigned to and current user name are displayed:
- Inventory button
Tap it to open the Inventory screen from where Item List, Inventory Counting, P.O. Center and Bin Locations screens are available.
- Sales button
Tap it to open the Customer Center screen.
- Transfer button
Tap it to open Transfer Center screen
- Admin button
Tap it to open the Admin menu from which Reports, Synchronize, Settings and About screens are available.
- Fulfillment button
........
Inventory Screen
Transfer Center Screen
Customer Center Screen
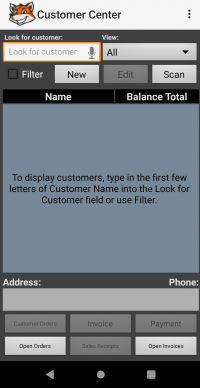
- Look for customer field allows looking for the customer you want to work with.
- View drop-down menu allows watching active or all the transactions.
- Filter checkbox allows creating filters to look for customers according to specific features.
- Look for field allows entering the information which helps to find the customer.
- In drop-down menu allows choosing the field to which the filter would be applied.
- Back button allows leaving the Filter screen without saving changes.
- Apply button allows applying filters.
- New button allows creating a new customer.
- Edit button allows editing created customers.
- Scan button allows looking for transactions with the help of a scanner.
| Customer Orders | Invoice | Payment |
|---|---|---|
The Customer Orders button opens the Customer Orders screen which allows performing different actions with sales orders like creating new, editing, picking, or invoicing.
|
The Invoice button opens the New Invoice screen which allows creating invoices. See Invoicing for more details. |
The Payment button opens the Payment Screen which allows applying payments to open invoices. |
| Open Orders | Sales Receipts | Open Invoices |
|
The Open Orders button opens the Open Orders Screen which allows performing different actions with open sales orders, such as editing and picking.
|
The Sales Receipts button opens the Sales Receipts screen which allows performing different actions with sales receipts, such as creating new ones and picking. See Sales Receipts for more details. |
The Open Invoices button opens the Open Invoices screen which allows viewing, editing and picking\packing open invoices. |
Admin Screen

